
07 Nov Framing The Walls And Roofing System For Custom Homes
Welcome to this edition of the Louisville Custom Home Builder Podcast series, brought to you by Louisville’s leading luxury construction team, Artisan Signature Homes. I’m Greg, your host, and for today’s episode, we are joined by Louisville’s best known and most accomplished custom and luxury home builder, Jason Black. Jason, as always, good to see you.
Jason: We really ought to stop meeting like this, Greg. People are going to start wondering.
Greg: We’re actually meeting differently today. We are at your new offices.
Jason: Yeah, we’re happy to have an actual space, not a house or a model home or anything. We kind of are like an official business now.
Greg: Three cheers.
Jason: That’s right. Watch out.
Greg: That’s right. On one of the more recent episodes of the Podcast, we talked about roughing in a basement with the plumbing and electric and water and getting ready for the next step, and the next step is?
Jason: Pouring the basement floor. It’s always a magical moment when you get that concrete covering it up. It really is a cool step or milestone in the process because what that really means is framing is next, and that’s when everybody is like, “When is framing going to start?” Now, is the time to start framing.
Greg: Is that the point at which most clients actually believe it’s a house, so to speak, instead of just sort of a dirty building zone, when they can start to see the walls go up?
Jason: I think what you see when framing happens is you see progress. If you think back, gosh, this has probably been a year ago, we talked about the emotional curve of building a house. When framing starts and framing gets going, you’re probably at almost one of the highest points of the process because all your hard work, all the planning, all the design, the time with the architect, designers, all that is really at a culmination to when you actually see, you actually, physically can see your house taking shape.
Greg: You were talking, and you said it many times, that when the walls start to go up, you’re probably six months in, and so it’s a lot of pent up emotion. Like I’m sure they’re chomping at the bit to see this house grow. Is that why it’s sort of the high end of the emotional…?
Jason: It is. Yeah, you’ve got 4 to 6 months of design time typically, sometimes less, and then a couple … You’re in the construction for a couple of weeks or a month or so, and you get to really see some progress, so I think that’s what really excites people, but we can step it back and kind of walk through the framing maybe a little bit and so people can know a little bit better about what to expect with maybe a custom build with Artisan Signature Homes when, hopefully, one day they decide to go through the process.
Greg: Absolutely, so, at this point, you have a prepared lot. You have a basement and basement walls. Right?
Jason: That’s right. One of the first things we do when we start framing is … what we’ll do is we’ll frame up usually the basement walls or whatever is needed to support the first floor system. Usually, we’re framing with I-joists, which is engineered lumber. We feel like we get a stronger floor with less squeaks, so we like to use the engineered lumber. We’ll lay the I-joist and then on top of that we almost always use a 3-quarter-inch product called AdvanTech. It’s a superior product. It’s been around for awhile, and it really resists warping. If it snows on and it rains on, it’s not going to matter. It doesn’t faze this material. Some guys out there still use plywood and some other inferior OSB products that just don’t hold up as well. OSB can be … the AdvanTech can be exposed to the elements for, I don’t know, months at a time and not falter.
We had a house one time that actually snowed on the sub-floor and stayed there for 2 weeks, iced over and it melted, and we moved on and didn’t have to do a thing, which was pretty awesome.
Greg: If you were using a different material, that would not be the case?
Jason: Yeah, so, if you use plywood or just regular OSB, it’s just not as strong and, sometimes, you have to come in and sand the seams or peel some layers out to get it smooth.
Greg: Okay, you said you set the I-beams. Where do you set them? Are these on the lumber of the walls in the basement that you said you just framed up? Are these actually resting on the concrete walls that you poured?
Jason: We’ll actually run a sill plate around the foundation of the house all the way around and then, typically, we’ll have I-beams, the steel that we talked about a couple episodes back, running … think of it running parallel to the house, cutting the house in the center, and then you’d have the I-beams resting on maybe the sill plate towards the front and then they’d cross over and sit on the steel beam in the middle. They’re typically going to span from 12 feet to 20 to 25 feet, somewhere in that kind of span. You can really eliminate a huge number of posts in the basement by using these engineered lumber pieces.
Greg: The engineered lumber pieces allow you, like you said, to skip the posts, but you would have to use monster sized lumber to get the same kind of strength, right?
Jason: That’s right. You’d have to. Usually, dimensional lumber is 2 by 12. It’s tough to span anything more than 18 or 20 feet with that, and then you have to put them so close together, and they crown. It’s just really tough to get a straight, solid floor with dimensional lumber these days.
Greg: Okay.
Jason: Okay, so we’ve set the I-beam. We’ve set the AdvanTech, and when we set that AdvanTech sub-floor, we actually glue it down and then we screw it down. We’re not just nailing it. We’re trying to eliminate any potential floor squeaks that may happen. We found, over the years, by gluing and screwing, you really can eliminate a lot of those issues.
Greg: Does that mean that the squeaking that a lot of people have in wood floors are the nails that were used to put the wood down sort of …
Jason: Yeah, it’s just so over time those nails will work themselves out a little bit. If it’s a high traffic area and you’re walking and going over it, they’ll slowly maybe come back to the surface. With the screws, they go in. They’re not coming out.
Greg: Okay.
Jason: Okay, so sub-floors down. Usually, we’ll do the first floor sub-floor, and then we’ll halt for a day and we’ll bring in our excavator and we will do what’s called … We’ll backfill the foundation. We’re putting the dirt all around the f0undation. We usually like to put the sub-floor on first to give those foundation walls some real stability before we’re … If you’ve got a 10-foot tall wall and you’re backfilling 8, 9-foot of dirt on it, it puts a lot of pressure on that wall, so-
Greg: You’re talking about a lot of pressure coming from the outside pushing towards the inside of the basement?
Jason: That’s correct. That’s correct. We want to try to give your foundation the best chance for long term success, and we found that letting it cure a little bit longer, getting the sub-floor on, we’ve got the basement floor poured, we’re putting some outward pressure on those walls now, and we can go ahead and backfill with dirt around the foundation.
Greg: What’s the importance of getting a good backfill in? Is there such a thing as a good backfill or a bad backfill?
Jason: Absolutely. You definitely want an experienced operator walking the dirt in there and trying to … Obviously, you don’t want guys driving across your foundation or getting too close to it with that heavy machinery. There is a certain way that we like to backfill and get that dirt walked in there so it gives it a better chance to settle properly over time.
Greg: Okay, so, now, you have sort of a really tight basement with your, I guess, a little cap on it, right, your sub-floor for the first floor?
Jason: Yep, so we’re poised, we’ve got a great clean site at this point, a lot of space, and we’ll bring in the next load of lumber, which is going to be the first floor walls, and then it’s pretty exciting. Before we start framing that, the framer will come in. We’ll take the blueprints and we will chalk lines all across the sub-floor and where all the walls are going to go, where all your doors are going to go, where all your window openings are going to be, so we may spend a half day chalking out the floor and then they’ll start laying out the 2 by 4 or, sometimes, we’re doing a lot of 2 by 6 walls, and we’ll lay those out, build one wall at a time on the ground, and then we’ll stand them up in place, and then it really looks like we have something going at this point.
Greg: What decision is that for you to choose between a 2 by 4 or a 2 by 6 wall?
Jason: It’s just more insulation. Usually, when we get in to some of our larger custom homes that are in that $600,000-$700,000-plus point, a lot of people like the more insulation, but they also like … You get a deeper window sill, so you get … Maybe if you’re going to do custom shutters or blinds down the road, you’ve got a spot where you can inset that into the actual window sill, and it just gives it a cleaner look when the house is all finished.
Greg: Okay.
Jason: Putting up first floor walls, a huge milestone, then it kind of flows fairly easily from there. We put up the second floor wall … or the second floor I-Joist, similar to what we did in the basement, and then we put the second floor sub-floor in at that point, and then we’ll put up the second floor walls. Moving right along at that point, we’ll go ahead and put the OSB on the exterior of those 2 by 4 and 2 by 6 walls.
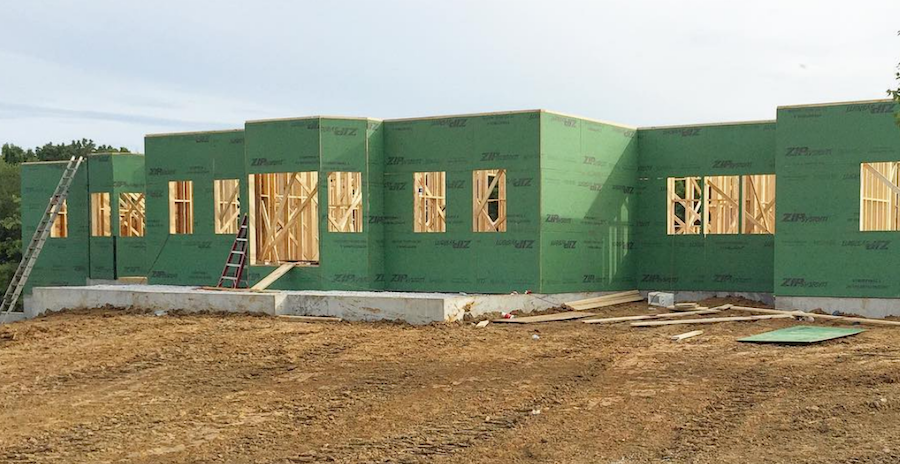
We use a product that’s called ZipWall. It has a built-in moisture barrier. A lot of times you’ll see just OSB wrapping the house, and that’s just kind of oriental strand board, it’s just basic lumber, and then they’ll wrap it, a lot of times, a house wrap material, or Tyvek is a very common brand. We stopped using that probably 8 or 9 years ago just for the fact of it’s got to be installed almost perfect to work properly. With the ZipWall, it has a builtin moisture barrier in the OSB, and then we tape the seams, and we’ve just found it gives you a much tighter house. It keeps the water out. It keeps the air out and, when we do our HERS testing with our outside independent rater, the ZipWall usually has better testing than the traditional OSB, so that’s why we like the ZipWall system.
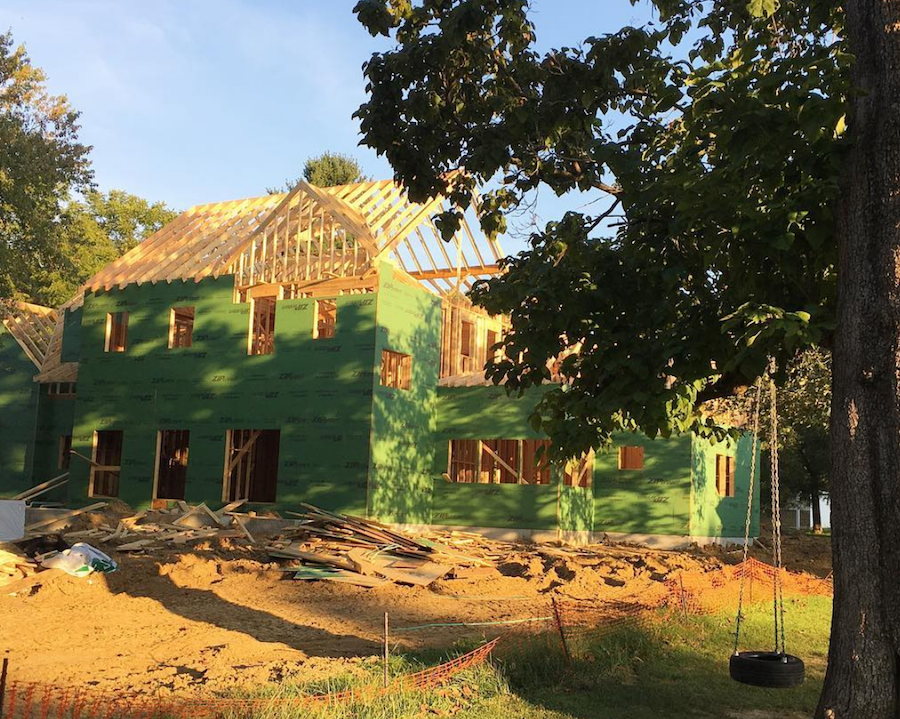
At this point, we’re framed up through the second floor. All the OSB is on. We start setting the roof rafters.
Greg: The whole house is resting on the foundation in the basement that has been engineered to support all this kind of weight?
Jason: That is correct. Everything carries and transfers loads down to the foundation walls and then, also, they’ll have some point loads that’ll carry through the center of the house, what are called load-bearing walls, down to the beams.
A lot of people watch the HGTV shows and Fixer Uppers that they’re like, “Is this a load-bearing wall or not?” and they’ll tear down a wall and go, “Oh, I didn’t think it was, but it really is.” Typically, those are bigger walls in the middle of the house, but they’re just transferring that load from the roof all the way down to the foundation.
Greg: Another question before you get us to the attic space, do you build the beams in the basement and the walls in the basement differently depending on how tall your house is going to be or how much load there is to bear?
Jason: Absolutely. Absolutely. It’s all engineered, and we’ll talk to our structural guy to figure out what size of beam we need and what type of spans we have before can actually start the construction.
Greg: Okay.
Jason: Second floor is up. We start setting the roof rafters, and we typically do what’s called stick framing. Some people will use trusses that are built in an assembly warehouse somewhere else and you’ve got to use a crane to hoist those in place, but I’ve always been a big fan of stick framing. We’ve been using the same framer for a long time. We get a great end result with the stick framing and it gives us some flexibility, too. If we want to do some decorative ceilings or a dome ceiling or tray ceilings, we can do that a little bit easier with stick framing. Basically, we’re just using dimensional lumber, 2 by 8s typically, something like that, and we’re running those roof rafters and then we’ll put an OSB or a roof sheathing on top of that, and that kind of, doesn’t quite dry in the house, but at that point it really looks like a house from the street.
Greg: All right, so that leads me to believe that there’s a step after you put that up and maybe-
Jason: Yeah, there’s one or two more steps that I guess maybe we can hit those in other episode. One final thing that we do, once we put the roof sheathing on, we will put a felt paper on top of that roof that will be ready to accept the shingles, and we can kind of get in to some of those I guess as we move forward with the series on the steps to building a new custom home.
Greg: I am really enjoying the series, and I’m looking forward to the next one. Thanks again for having me out to your new office.
Jason: No problem, Greg. Take care.
Thank you for joining us on this episode of the Louisville Custom Home Builder Podcast. If you’re looking to build a home and would like to reach out to Jason with any questions about the process or maybe just your individual needs and desires, please visit the website at artisansignaturehomes.com. We appreciate your time with us today and look forward to bringing you another episode next week.